erik ten hag
Manchester United, 2022–
Profile
Erik ten Hag came to the world's attention when leading Ajax to the semi finals of the 2018/19 Champions League. The Dutchman was still in his first full season in charge of the four-time European Cup winners, but he successfully led them from the second round of qualifying all the way to a semi final they dominated but ultimately lost to eventual runners-up Tottenham.
It wasn’t only the run that impressed, however. It was also the manner in which a young, vibrant Ajax team fashioned in the image of its illustrious predecessors went about it. Ten Hag built his team around a core of young Dutch talent including Matthijs de Ligt, Frenkie de Jong and Donny van de Beek, and complemented it with the attacking flair of Hakim Ziyech, Dusan Tadic and David Neres. Decisive away wins against Real Madrid and Juventus in the knockout stages alerted many to the merits of both team and manager.
Ten Hag took on his first managerial role – at Go Ahead Eagles, then in the Dutch second division – as recently as 2012/13. A two-year spell at Bayern Munich II followed, before a return to the Netherlands with Utrecht. After leading them to fifth and fourth in the Eredivisie in his two full seasons, Ten Hag was appointed to succeed Marcel Keizer at Ajax in December 2017. He achieved league-and-cup doubles in two of his first three full seasons with the Dutch giants, deprived of a league hat-trick only by the Covid-forced cancellation of the 2019/20 season. It is perhaps no surprise, then, that Manchester United have chosen to appoint him as their new manager for the start of the 2022/23 season.
Playing style
Utrecht and the diamond
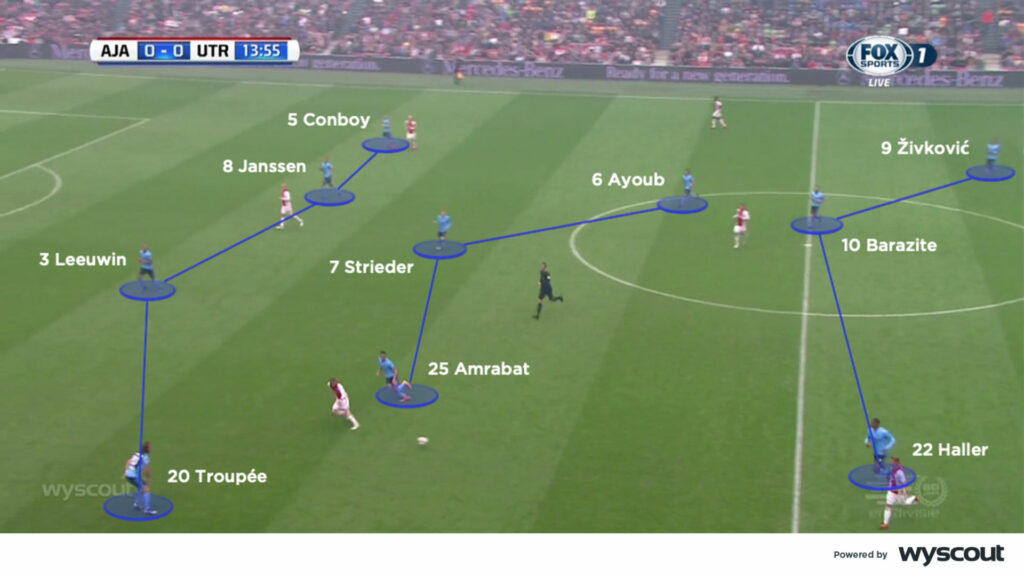
At Utrecht, Ten Hag occasionally used a back three but mostly favoured the 4-4-2 diamond or 4-3-3 formations. His front line was led by Sébastien Haller, with whom he was later reunited at Ajax (see below). Haller was usually supported by one of Nacer Barazite or Bart Ramselaar in the number 10 role, with Ruud Boymans, Patrick Joosten or later Richairo Živkovic joining as a second forward. When Barazite took up the number 10 position, Ramselaar often dropped to the right side of the midfield diamond.
The use of this midfield diamond meant that attacking width and crosses were most commonly supplied by the full-backs. Inside, Ten Hag’s structure allowed for multiple rotations. The single pivot at the base of the diamond often dropped into the back line (below). This helped with the build-up, but also encouraged the full-backs to push even further forward. The number 10 often rotated with the number eights on either side of the diamond, while dropping movements from a second forward helped create overloads and short passing options in central areas.
When Ten Hag set his team up in a 4-3-3 shape, the central forward in that front three made similar dropping movements into what was in effect a number 10 position. The wider forwards then moved inside in the attacking phase. As a result, the team’s 4-3-3 and 4-4-2 diamond formations were actually very similar in design.
In the 2015/16 season, Utrecht ranked second in the Eredivisie for progressive passes. Ten Hag’s desire to have multiple options at 10, using rotations and movement to create passing options between the lines, was key to this. It has been a central theme throughout his coaching career.
Ajax and the double pivot
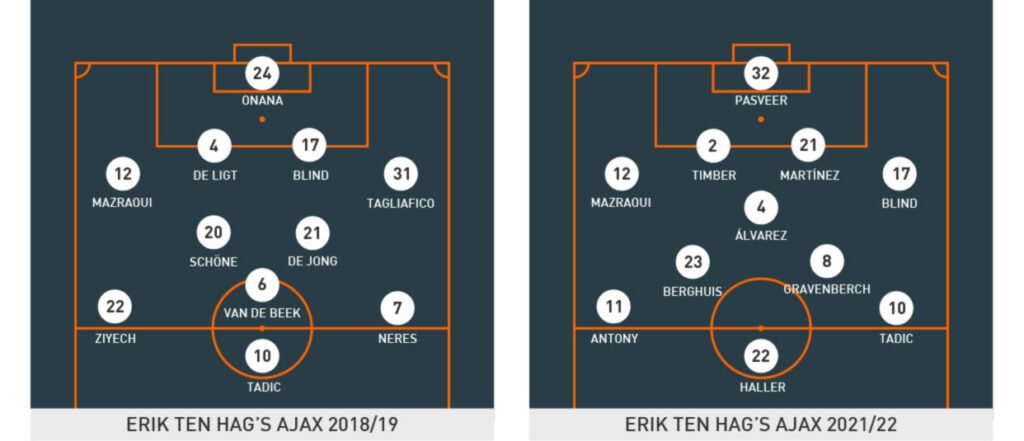
Having taken the Ajax job in December 2017, Ten Hag ultimately converted the team’s existing 4-3-3 into the 4-2-3-1 shape that worked so well in their explosive 2018/19 season. The double pivot of Lasse Schöne and Frenkie de Jong sat in front of the back four, but also supplied the fluid attacking quartet ahead of them. Former Southampton attacker Dusan Tadic was most regularly used as the central forward in that remarkable Champions League run. Ziyech, Van de Beek and Neres then formed the line of three behind him.
Domestically, Tadic often operated from the left, with either Kasper Dolberg or Klaas-Jan Huntelaar starting as the nine. On the right, Ziyech looked to cut back inside on his stronger left foot and shoot, cross or connect with the team’s central attackers. Right-back Noussair Mazraoui provided delayed attacking support while still offering a link to the back line or double pivot.
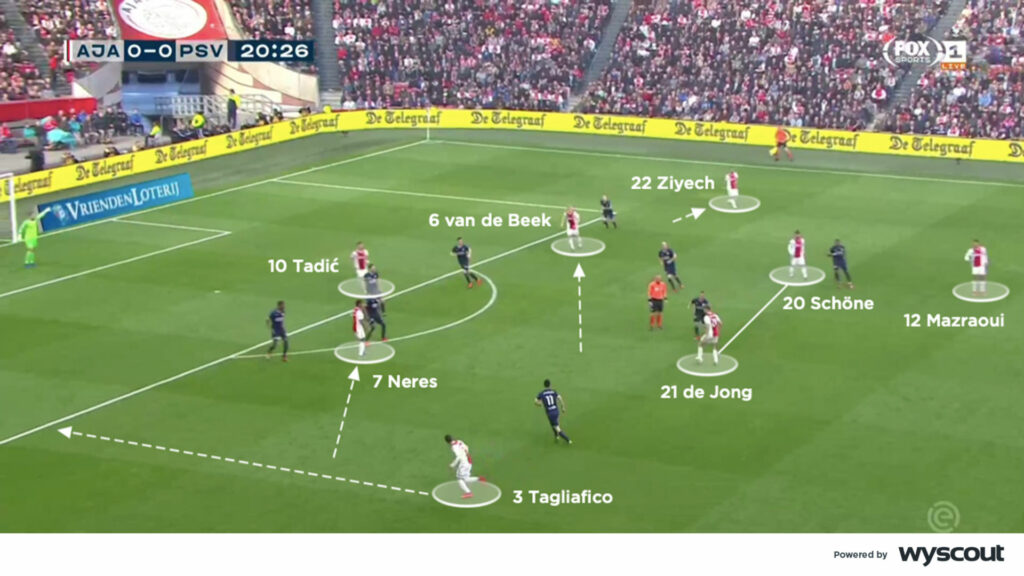
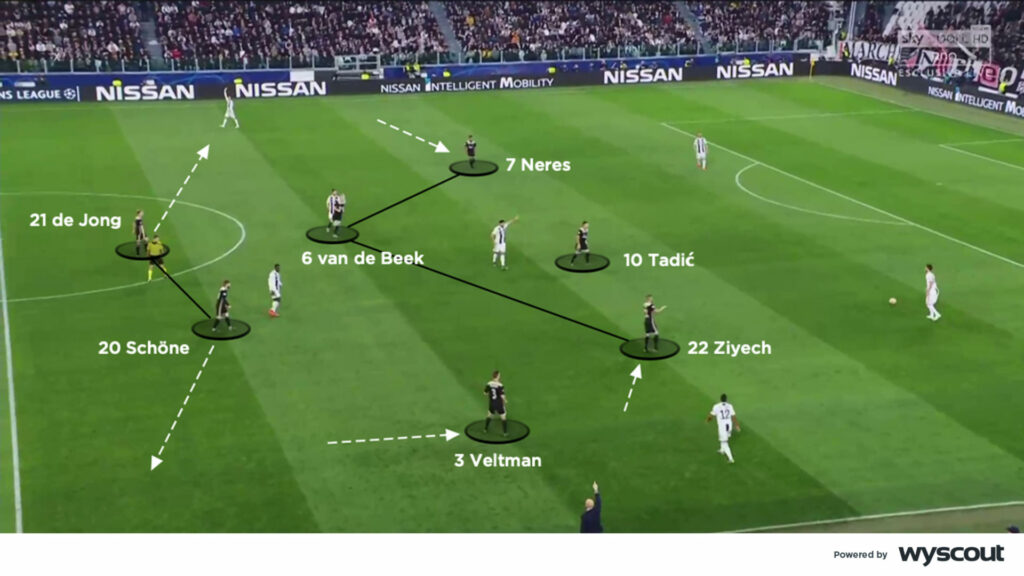
On the left, either Neres or Tadic moved inside much earlier, with the latter often operating more as a second centre-forward when he started there. This created significant room for left-back Nicolás Tagliafico to overlap (above) and provide crosses from deep positions. Here, the double pivot helped cover underneath Tagliafico’s advances. One of them could drop into the back line to support centre-backs Matthijs de Ligt and Daley Blind when required.
As the number 10, Van de Beek moved intelligently between the lines – but he was most effective in the right inside channel. His movements to this side complemented the width provided by Ziyech, while also creating room for Tadic to exploit when coming in from the left or for the central striker to drop into. As with his Utrecht team, Ten Hag’s Ajax built their attacking play on constant rotations.
The return to 4-3-3
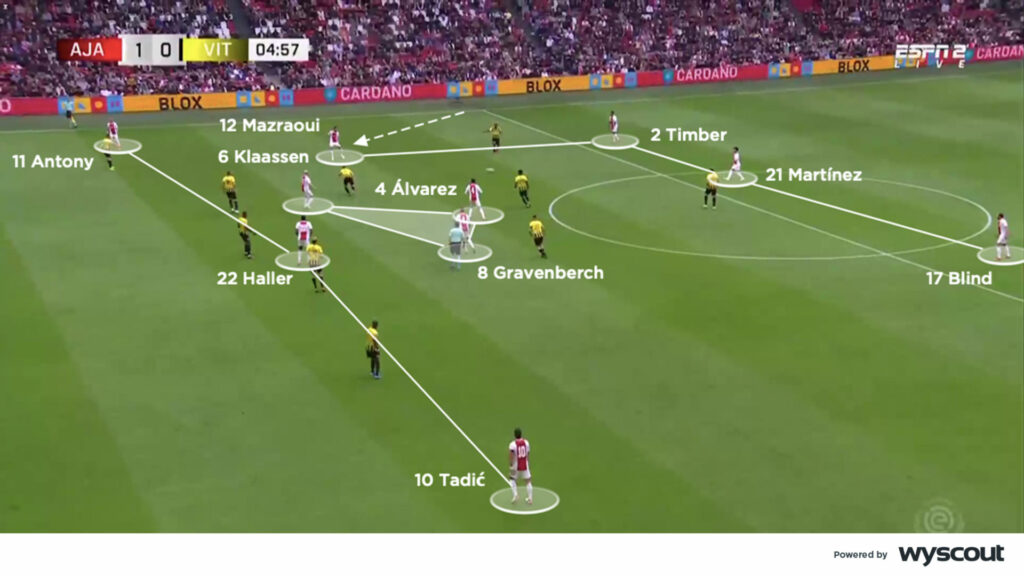
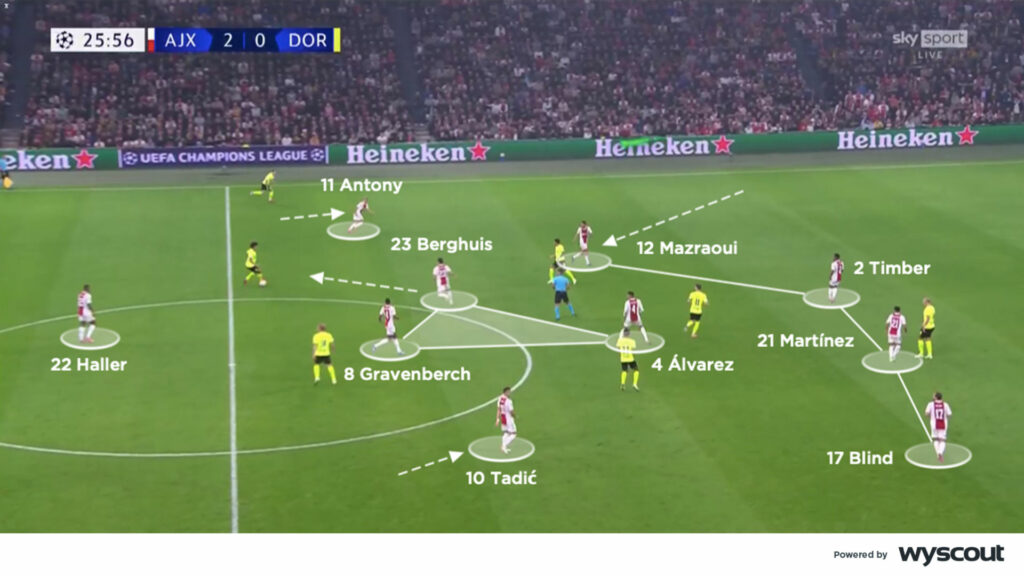
Many of those who starred in the 2018/19 Ajax team have since departed, but Ten Hag has adapted and rebuilt his team. He has reverted to a 4-3-3 shape and been reunited with Haller – a January 2021 arrival from West Ham – who has slotted into the centre-forward position he previously inhabited at Utrecht. Tadic remains on the left, from where he continues to drift inside. Here he is supported by Blind – another survivor from the Champions League semi-finalists – who has moved to left-back. Blind’s experience at centre-back allows Ajax to build with a back three. Mazraoui then pushes further forward, inside either Antony or Neres, on the right (below).
The width that Tadic maintains on the left enables the midfielders to push forward and make supporting runs around Haller, particularly from the exciting Ryan Gravenberch on the left. Blind offers cover behind but can also move inside, alongside defensive midfielder Edson Álvarez in an occasional double pivot. The ultimate goal is always the same, however – to use rotations to create central overloads and passing lanes that enable Ten Hag’s side to attack the spaces between the lines.
Defensive phase
Vulnerability in the inside channels
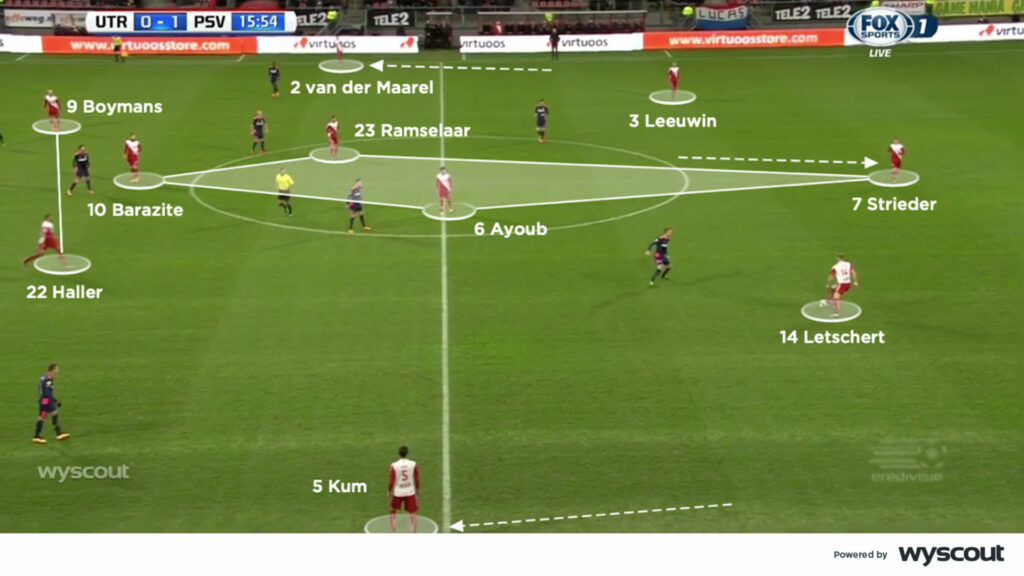
Without the ball, Ten Hag’s Utrecht mostly dropped into a 4-3-3 shape. The central forwards would defend on the outsides of the front line, around which opponents often looked to build. They could then target the space between centre-back and the aggressive press of the full-backs.
The number eights would cover the inside channels, but if the distances were too great or the back line failed to slide over enough, opponents could exploit the spaces and penetrate through these channels (below). The team looked more compact when the full-backs held their position and the number eights covered the wide areas. Here, the forwards could drop to help cover central areas, although this inevitably limited Utrecht’s threat on the counter.
When defending in their 4-4-2 diamond shape, the number 10 could drop deeper, enabling the number eights to begin wider. This allowed them to press earlier in wide areas, but also enabled the full-backs to stay better connected to the back line.
The diamond would shift towards the ball, attempting to lock play on one side. The full-back on that side would then be ready for any ball down that side, either to feet or in behind. The closest of the two centre-forwards would press from behind, attempting to stop the opponents recycling possession when forced back.
The importance of the double pivot
Apart from 2018/19, when they were second, Ajax have topped the challenge intensity stats in each of Ten Hag’s campaigns. This indicates a clear defensive approach based on aggressive pressing, tackling and intercepting whenever the opposition have possession.
From a 4-2-3-1 defensive structure, the wide players would move inside to support the forward in limiting central play (below). Narrow positioning in the inside channels also allowed pressure into wide areas, especially when the opposing centre-backs split during build-up. In these moments, the centre-forward would drop slightly, marking and screening the opposing pivot. The number 10 could also then drop back, allowing the double pivot to support wider pressing by moving across earlier.
Here, the full-back could stay more attached to the back line, as in Ten Hag’s later days at Utrecht. Alternatively, if the full-back did jump to press wide, the nearest member of the double pivot could drop in and cover behind.
When the centre-forward pressed higher and the wingers covered wide areas, the double pivot looked to press more aggressively. Both De Jong and Schöne pressed in the second line, jumping out during switches of play – particularly if the full-back on the far side held their deeper position. They were also expected to lead an aggressive counter-press if and when opponents broke up Ajax attacks through the central areas and targeted wide areas in transition.
Pressure on the ball
More recently, Ten Hag’s switch to a 4-3-3 with Ajax has led to a different defensive approach. The central striker, mostly Haller, stays high rather than dropping to cover the opposing pivot. The wingers track opposing runs into wide areas, especially if the full-back has aggressively pressed in the inside channels (below).
The number eights cover the inside channels aggressively, too. They will individually jump forward to support the press between the centre-forward and winger. With the wingers supporting back, the central midfield can focus more on the areas ahead of the two centre-backs.
The common theme running throughout Ten Hag’s defensive approach is the individual jumping and pressing out of line. Whether that’s a centre-back pushing out to deal with a dropping attacker, or a number eight pushing forward to press a dropping pivot, Ten Hag wants his players to work forward on to the ball – even if it means assertively leaving the line of defence. This puts constant pressure on the ball and, from a compact mid-block, forces the opposition back and away from goal.